Healthy Kid Snacks That They’ll Actually Eat (No More Rejected Veggies!)
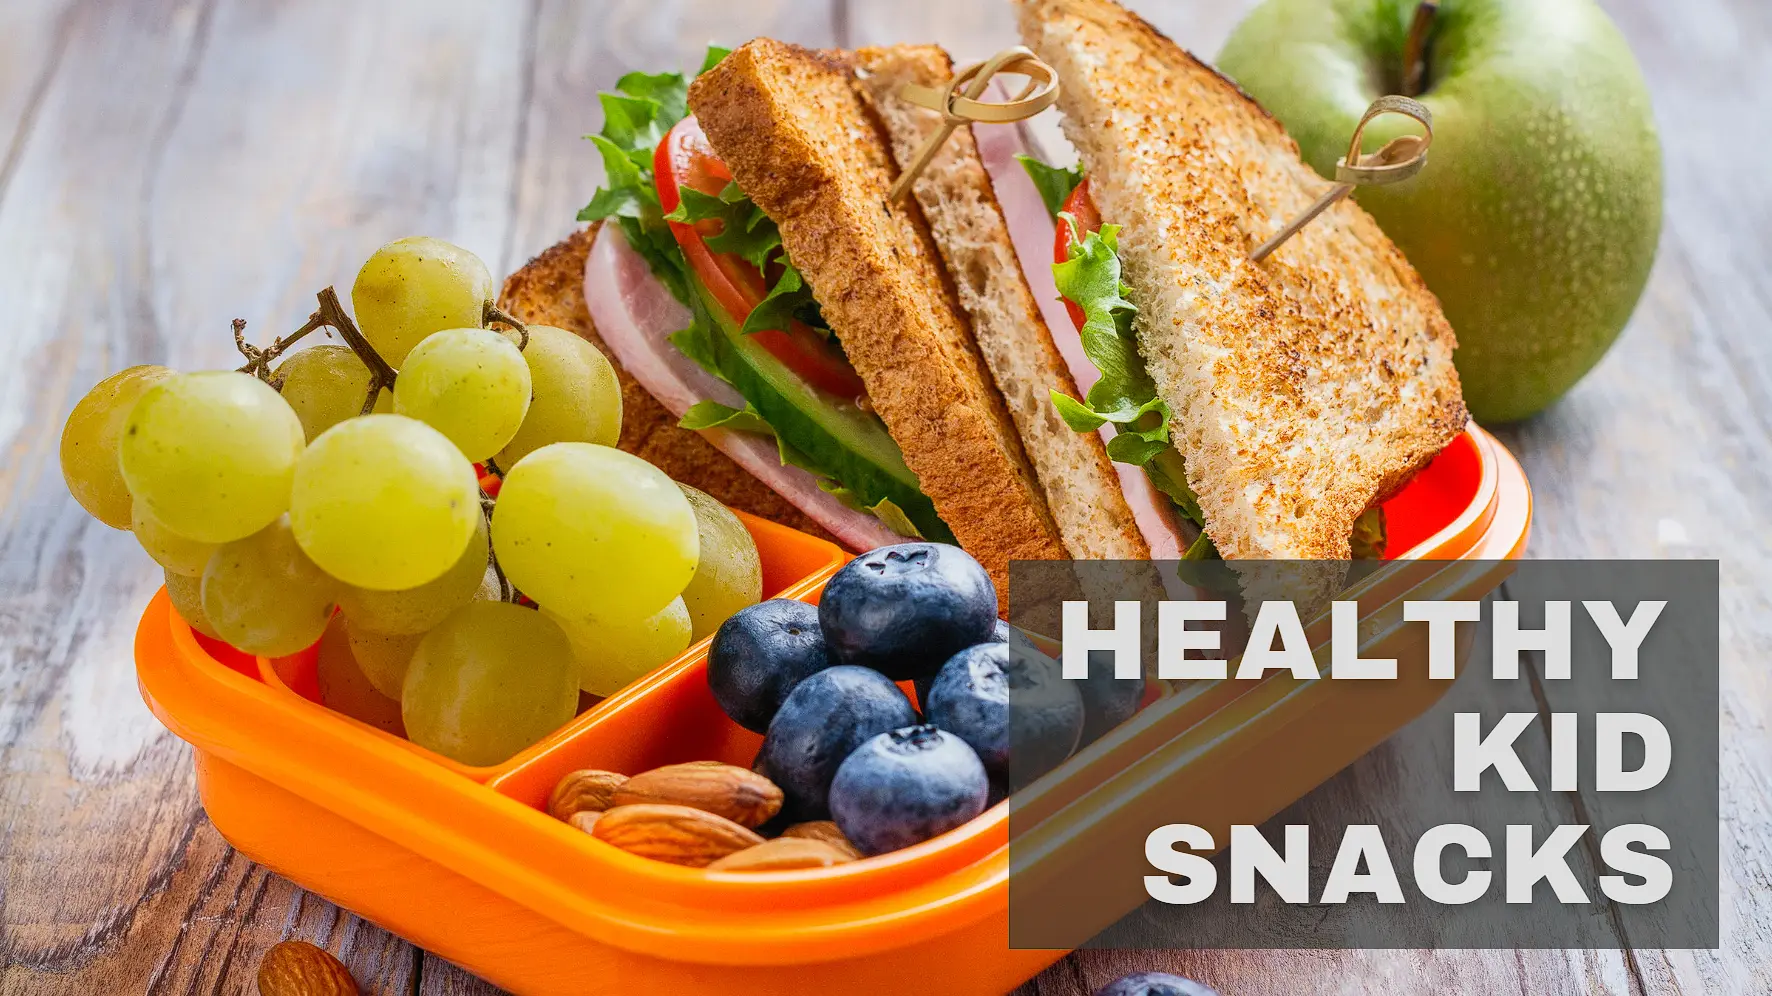
As a mom who’s packed approximately 4,372 school snacks (and watched roughly half come home uneaten), I’ve become a snack-making scientist. Through years of experimentation (and many failed attempts), I’ve cracked the code to healthy snacks kids genuinely enjoy. These aren’t just nutritious – they’re fun to make, exciting to eat, and parent-approved for simplicity.
Here are my 5 most successful snack recipes, each with foolproof instructions, storage tips, and kid-tested serving suggestions. I’ll walk you through every step like I’m right there in your kitchen with you!
1. Magic Yogurt Bark
(Freezer-friendly, protein-packed, perfect for hot days)
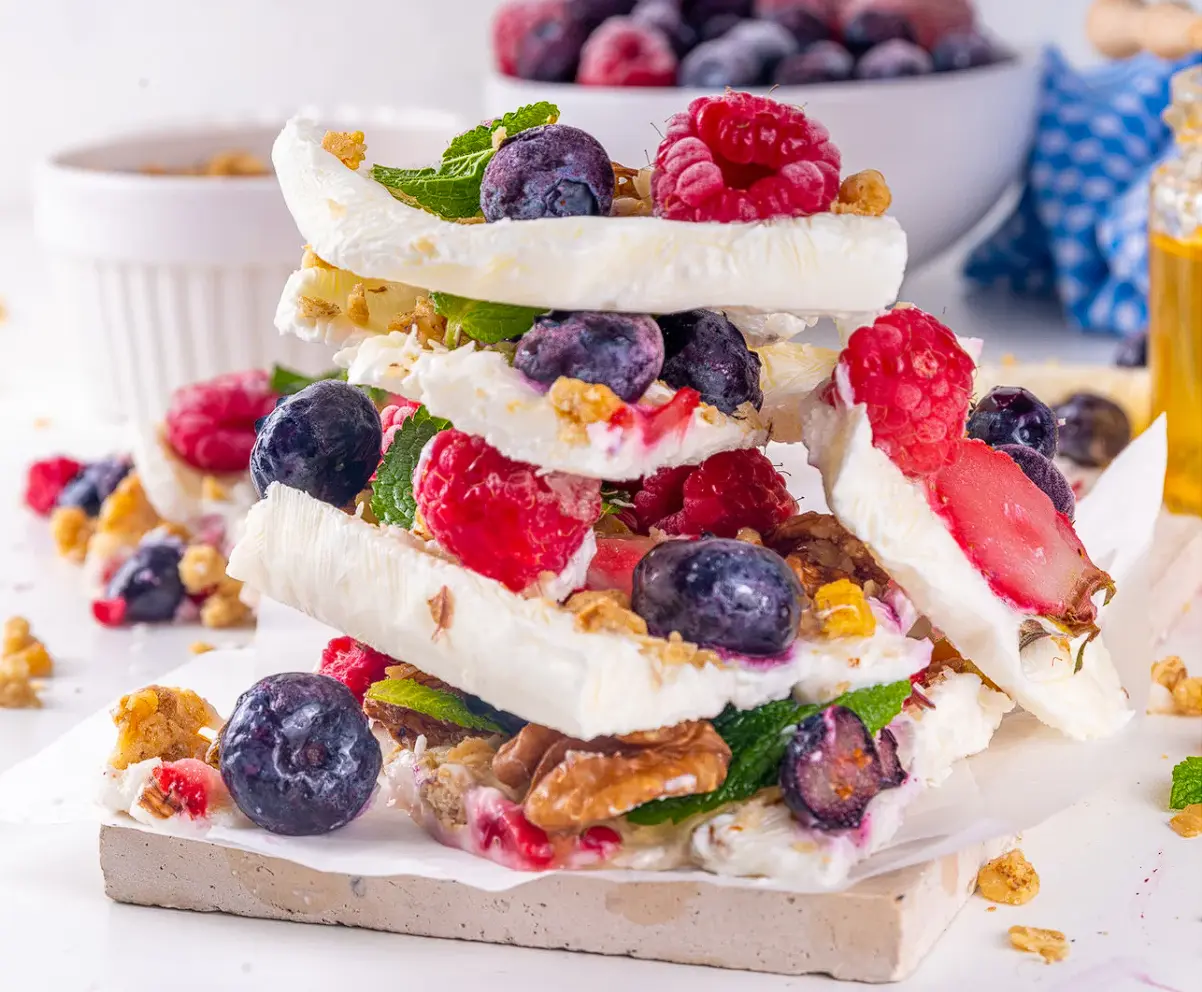
Why This Works:
- Cold and sweet like ice cream but with 5x the protein
- Customizable with endless topping combinations
- Helps kids practice fine motor skills when breaking pieces
Detailed Ingredients:
Base:
- 2 cups Greek yogurt (whole milk for creaminess)
- Vanilla for sweetness or plain for less sugar
- 1-2 tbsp honey or maple syrup
- Adjust based on yogurt sweetness
- 1/2 tsp vanilla extract (if using plain yogurt)
Topping Ideas (mix & match):
- Fruit: Blueberries, raspberries, diced mango
- Crunch: Granola, crushed pretzels, chopped nuts
- Fun: Mini chocolate chips, sprinkles (for special days)
- Nutrition Boost: Chia seeds, hemp hearts
Step-by-Step Instructions:
1. Prep Your Pan:
- Line a 9×13″ baking sheet with parchment paper
- Tip: Lightly grease the paper for easier removal
2. Create the Base:
- In a medium bowl, whisk together:
- Yogurt
- Honey/maple syrup
- Vanilla (if using)
- Taste and adjust sweetness
3. Spread It Out:
- Pour mixture onto prepared pan
- Use a spatula to spread evenly (about 1/4″ thick)
- Pro Tip: Make some areas slightly thicker for varied textures
4. Add Toppings:
- Sprinkle toppings over surface
- Gently press them in so they adhere
- Kid Activity: Let children create patterns or “zones” with different toppings
5. Freeze Properly:
- Place flat in freezer
- Freeze at least 3 hours (overnight is best)
- Important: Don’t cover until fully frozen to prevent condensation
6. Break and Store:
- Remove from freezer
- Lift parchment to transfer to cutting board
- Crack into irregular pieces (kids love helping with this!)
- Store in freezer-safe container with parchment between layers
Serving Suggestions:
- After-school “ice cream” treat
- Lunchbox addition (stays cold until lunch)
- Post-sports snack with a glass of milk
Storage: Keeps for 2 weeks in freezer
Nutrition Per Serving (1/8 recipe):
- Calories: 90
- Protein: 6g
- Calcium: 15% DV
2. Pizza Quesadillas
*(5-minute savory snack, hidden veggies possible)*
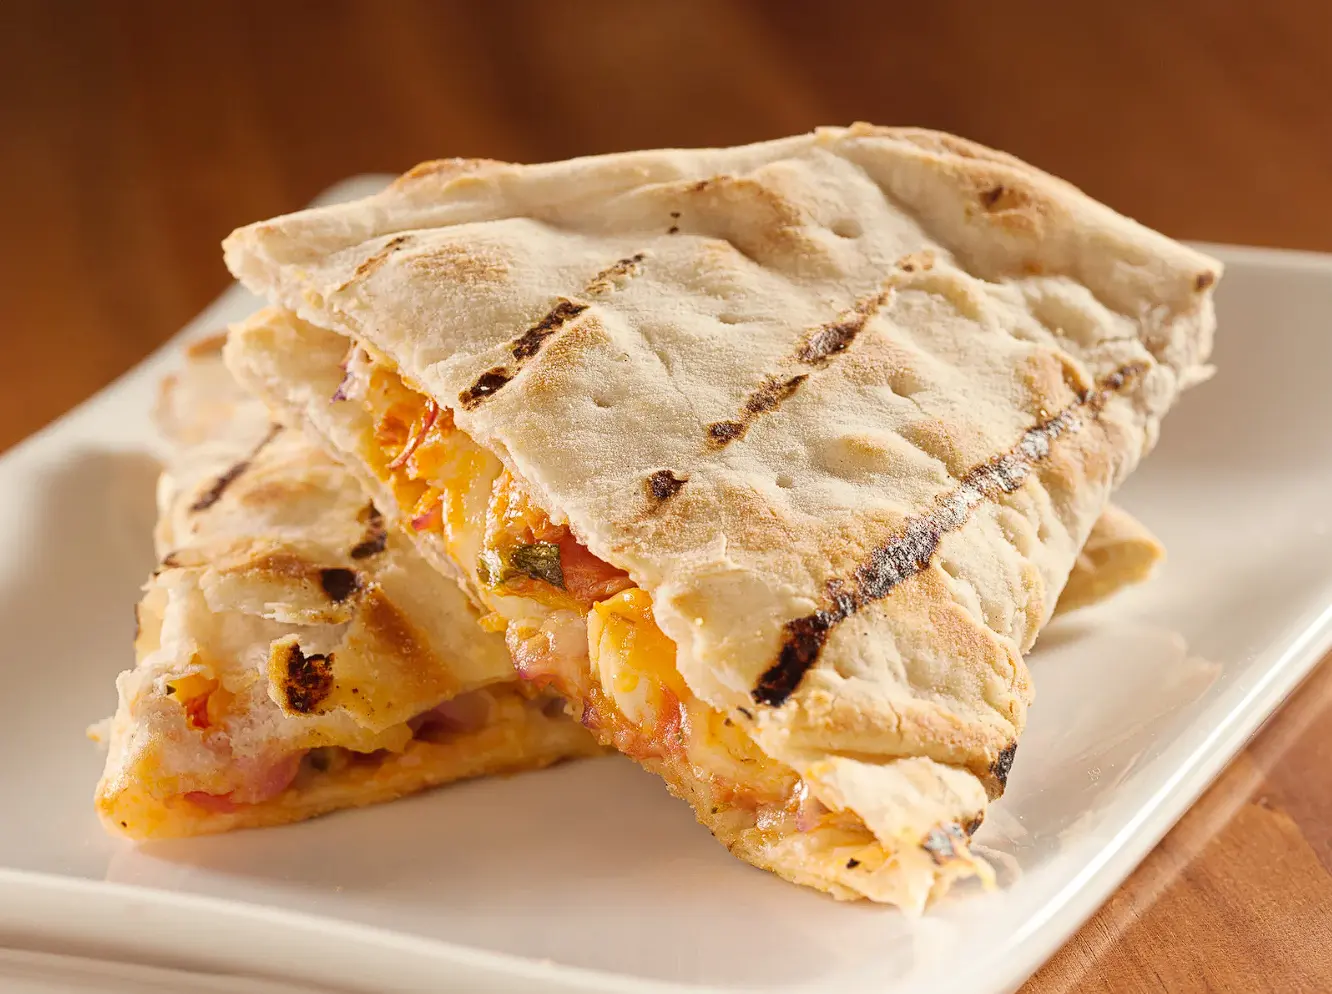
Why This Works:
- Familiar pizza flavor in easy-to-hold form
- More balanced than traditional pizza
- Endless customization options
Detailed Ingredients:
Per Quesadilla:
- 1 whole wheat tortilla (8″)
- 2 tbsp pizza sauce
- Look for low-sodium options or make your own
- 1/4 cup shredded mozzarella
- Optional add-ins:
- Protein: Diced ham, turkey pepperoni, cooked chicken
- Veggies: Finely chopped spinach, mushrooms, bell peppers
- Boost: 1 tsp grated Parmesan or nutritional yeast
Step-by-Step Instructions:
1. Prep Ingredients:
- Have all toppings ready (great job for kids!)
- Tip: Chop veggies very small so they cook quickly
2. Assemble:
- Spread sauce evenly over half the tortilla
- Sprinkle cheese evenly
- Add other toppings
- Kid Activity: Let them create “faces” or patterns with toppings
3. Cook to Perfection:
- Heat a dry skillet over medium heat
- Fold tortilla in half, press gently
- Cook 1-2 minutes until golden brown
- Flip carefully, cook other side
- Pro Tip: Cover with lid briefly to melt cheese completely
4. Cool and Cut:
- Let rest 1 minute before cutting (prevents burns and keeps fillings inside)
- Cut into wedges with pizza cutter
- Fun Idea: Use cookie cutters for shaped pieces
Serving Suggestions:
- With marinara for dipping
- Paired with carrot sticks and ranch
- As part of a “snack lunch” with fruit
Storage: Best fresh, but can refrigerate for 1 day and reheat in toaster oven
Nutrition Per Quesadilla:
- Calories: 220
- Protein: 12g
- Fiber: 3g
3. Banana Sushi Rolls
(Fun with fruit, no cooking required)

Why This Works:
- Novel presentation makes fruit exciting
- Perfect for little hands to hold
- Great introduction to kitchen skills
Detailed Ingredients:
Per Roll:
- 1 small banana (just ripe)
- 1 whole wheat tortilla or flatbread
- 1 tbsp nut/seed butter
- Options: Peanut, almond, sunflower seed butter
- Optional coatings:
- Shredded coconut
- Mini chocolate chips
- Crushed cereal
- Ground flaxseed
Step-by-Step Instructions:
1. Prep Work Surface:
- Lay out tortilla on clean cutting board
- Have all ingredients within reach
2. Spread the Base:
- Spread nut butter evenly over entire tortilla
- Tip: Leave 1/2″ border at top edge for sealing
3. Add the Banana:
- Place whole, unpeeled banana at bottom edge
- Kid Activity: Let them roll it up themselves
4. Roll It Up:
- Fold sides in slightly
- Roll tightly from bottom to top
- Press gently to seal
5. Slice and Coat:
- Cut into 1″ pieces with sharp knife
- Optional: Roll edges in coatings for extra fun
6. Serve Creatively:
- Arrange on plate like sushi
- Provide toothpicks for easy eating
- Offer yogurt or melted chocolate for dipping
Serving Suggestions:
- After-school energy boost
- Playdate snack
- Breakfast on busy mornings
Storage: Best eaten immediately, but can wrap tightly and refrigerate for 2 hours
Nutrition Per Roll:
- Calories: 180
- Potassium: 15% DV
- Fiber: 4g
4. Rainbow Veggie Cups
(Sneaky crunch, visually appealing)

Why This Works:
- Individual portions feel special
- Dipping is inherently fun for kids
- Colorful presentation encourages trying new veggies
Detailed Ingredients:
Per Cup:
- 1/4 cup hummus or Greek yogurt dip (base layer)
- Assorted veggie “sticks” (1 tbsp each):
- Red: Cherry tomatoes or red bell pepper
- Orange: Carrot sticks or orange pepper
- Yellow: Yellow pepper or summer squash
- Green: Cucumber or sugar snap peas
- Purple: Purple carrot or cabbage
- Optional garnishes:
- Sesame seeds
- Everything bagel seasoning
Step-by-Step Instructions:
1. Select Your Containers:
- Clear plastic cups (2-4 oz size)
- Small mason jars
- Reusable silicone cupcake liners
2. Create the Base:
- Spoon hummus or dip into bottom
- Smooth surface with back of spoon
3. Prep the Veggies:
- Cut into uniform sticks (about 3″ long)
- Tip: Use a crinkle cutter for fun shapes
4. Assemble the Rainbow:
- Stand veggie sticks upright in hummus
- Arrange by color for rainbow effect
- Kid Activity: Let them create patterns
5. Add Finishing Touches:
- Sprinkle with seeds or seasoning
- Add a small spoon for scooping
Serving Suggestions:
- After-school hunger buster
- Party or playdate snack
- Lunchbox addition (pack dip separately)
Storage: Assemble up to 4 hours ahead, cover with damp paper towel
Nutrition Per Cup:
- Calories: 80
- Vitamin A: 30% DV
- Fiber: 3g
5. Peanut Butter Oat Energy Bites
(No-bake, perfect for lunchboxes)
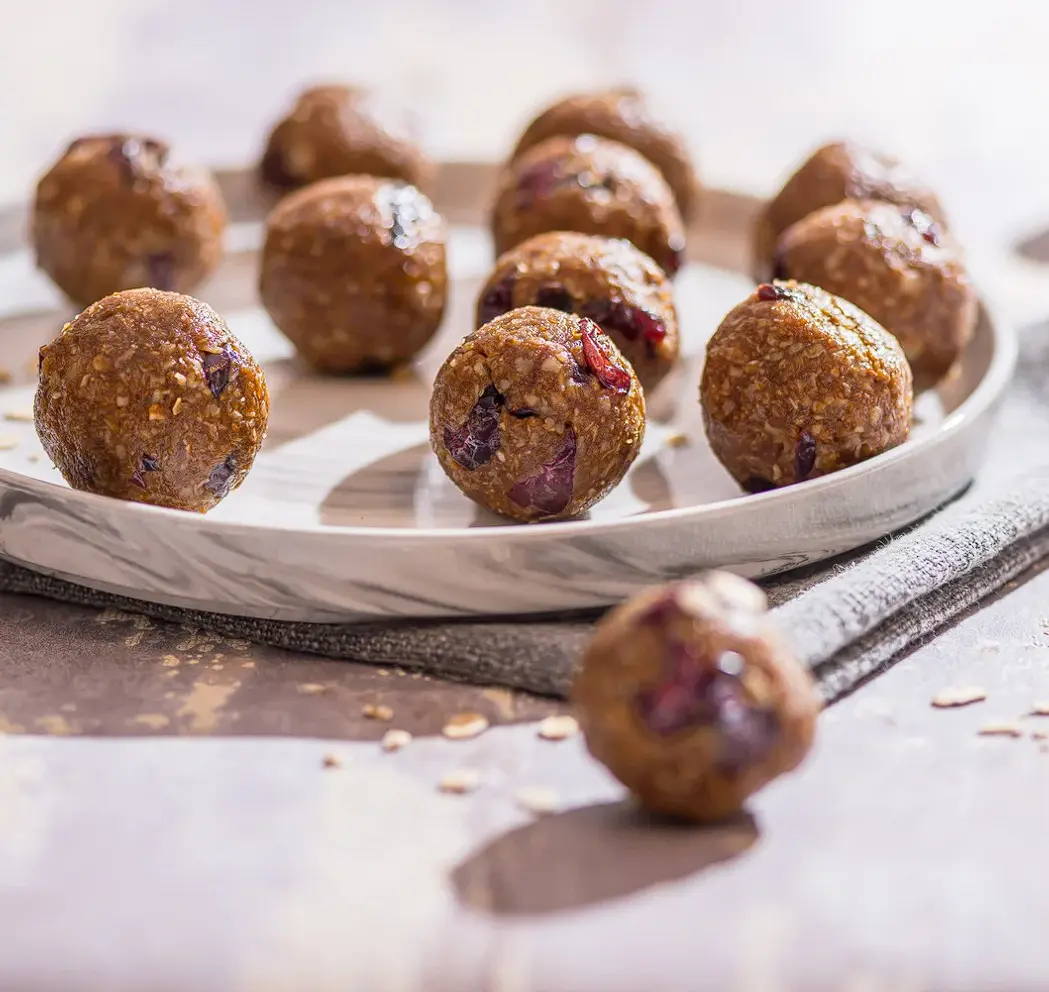
Why This Works:
- Naturally sweet without refined sugar
- Packed with protein and fiber
- Fun to make together
Detailed Ingredients:
For 12 Bites:
- 1 cup old-fashioned oats
- 1/2 cup natural peanut butter
- 1/4 cup honey or maple syrup
- 1 tbsp chia seeds
- 1 tsp vanilla extract
- 1/4 cup mini chocolate chips
- 2 tbsp ground flaxseed
Step-by-Step Instructions:
1. Mix Dry Ingredients:
- In medium bowl, combine:
- Oats
- Chia seeds
- Flaxseed
2. Add Wet Ingredients:
- Stir in peanut butter, honey, and vanilla
- Tip: If mixture seems dry, add 1 tsp milk
3. Incorporate Mix-ins:
- Fold in chocolate chips
- Variation Ideas:
- Dried fruit instead of chocolate
- Coconut flakes
- Crushed pretzels
4. Chill the Dough:
- Refrigerate 30 minutes (makes shaping easier)
5. Roll Into Balls:
- Use a tablespoon to portion
- Roll between palms to form balls
- Kid Activity: Great for little hands to practice
6. Set and Store:
- Place on parchment-lined tray
- Refrigerate 1 hour to firm up
- Transfer to airtight container
Serving Suggestions:
- Lunchbox treat
- Pre-sports energy boost
- After-dinner “dessert”
Storage: 1 week in fridge, 1 month in freezer
Nutrition Per Bite:
- Calories: 110
- Protein: 3g
- Fiber: 2g
Final Thoughts: Making Healthy Snacks Work for Your Family
After years of snack trials, here’s my biggest lesson: presentation matters more than we think. The same carrots kids ignore on a plate become exciting when standing upright in hummus “dirt.” The banana they’d normally half-eat becomes a treat when presented as “sushi.”
Three game-changing tips:
- Involve kids in preparation – They’re more invested in eating their creations
- Keep healthy options visible – A fruit bowl at eye level gets eaten more
- Don’t stress perfection – Some rejected snacks are inevitable, and that’s okay
Which snack will you try first? I’d love to hear how your kids respond to these ideas!
P.S. For more recipes, try my Vegetarian Recipes or Spring Meals next! 🍎✨